
Click To Move in Unreal
[ue4 c++ In this post I want to describe an approach I’ve used for controlling a character in Unreal with a click-to-move scheme. There is a sample with the Unreal Engine that has simple click-to-move, but I want something that gives me more control, allowing me to visualize the path, for example, and to allow integration with a WASD control scheme.
The Top Down sample project uses the Simple Move to Location node to navigate the character to the clicked location. I’m basing my sample project off of that project - it already has the appropriate camera setup and controls, but I’ll show how to set it up with my approach. Note that the map already has a NavMeshBoundsVolume set up - don’t forget to add that if you’re trying this out it in a different map - this is needed to create the navigation mesh we use to find paths in the map.
The NavigatorComponent
The Navigator component has two main functions:
- FindPathToLocation - it takes in the location and returns an array of waypoints that get you there
- Navigate - it takes in an array of points, as returned by the FindPathToLocation function above
Having these functions separate offers more flexibility, for example allowing a preview of the path before committing to it.
We’ll look at the component itself in more detail later - let’s first look at the changes to the basic Top Down project I made to use my component.
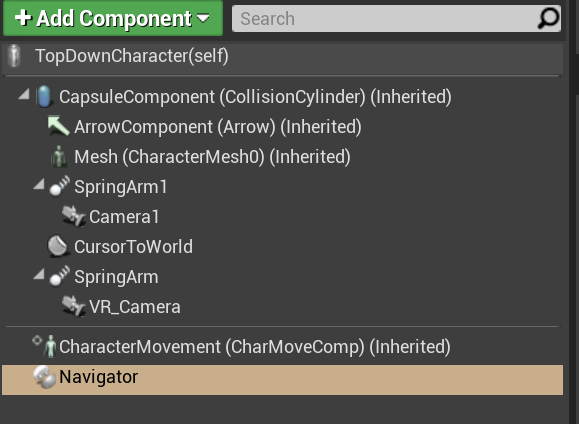
Add the component to the character
First off, we need to add the component to the TopDownCharacter class:
Use the component for path finding
The next step is to change the MoveToHitLocation blueprint in the TopDownController:
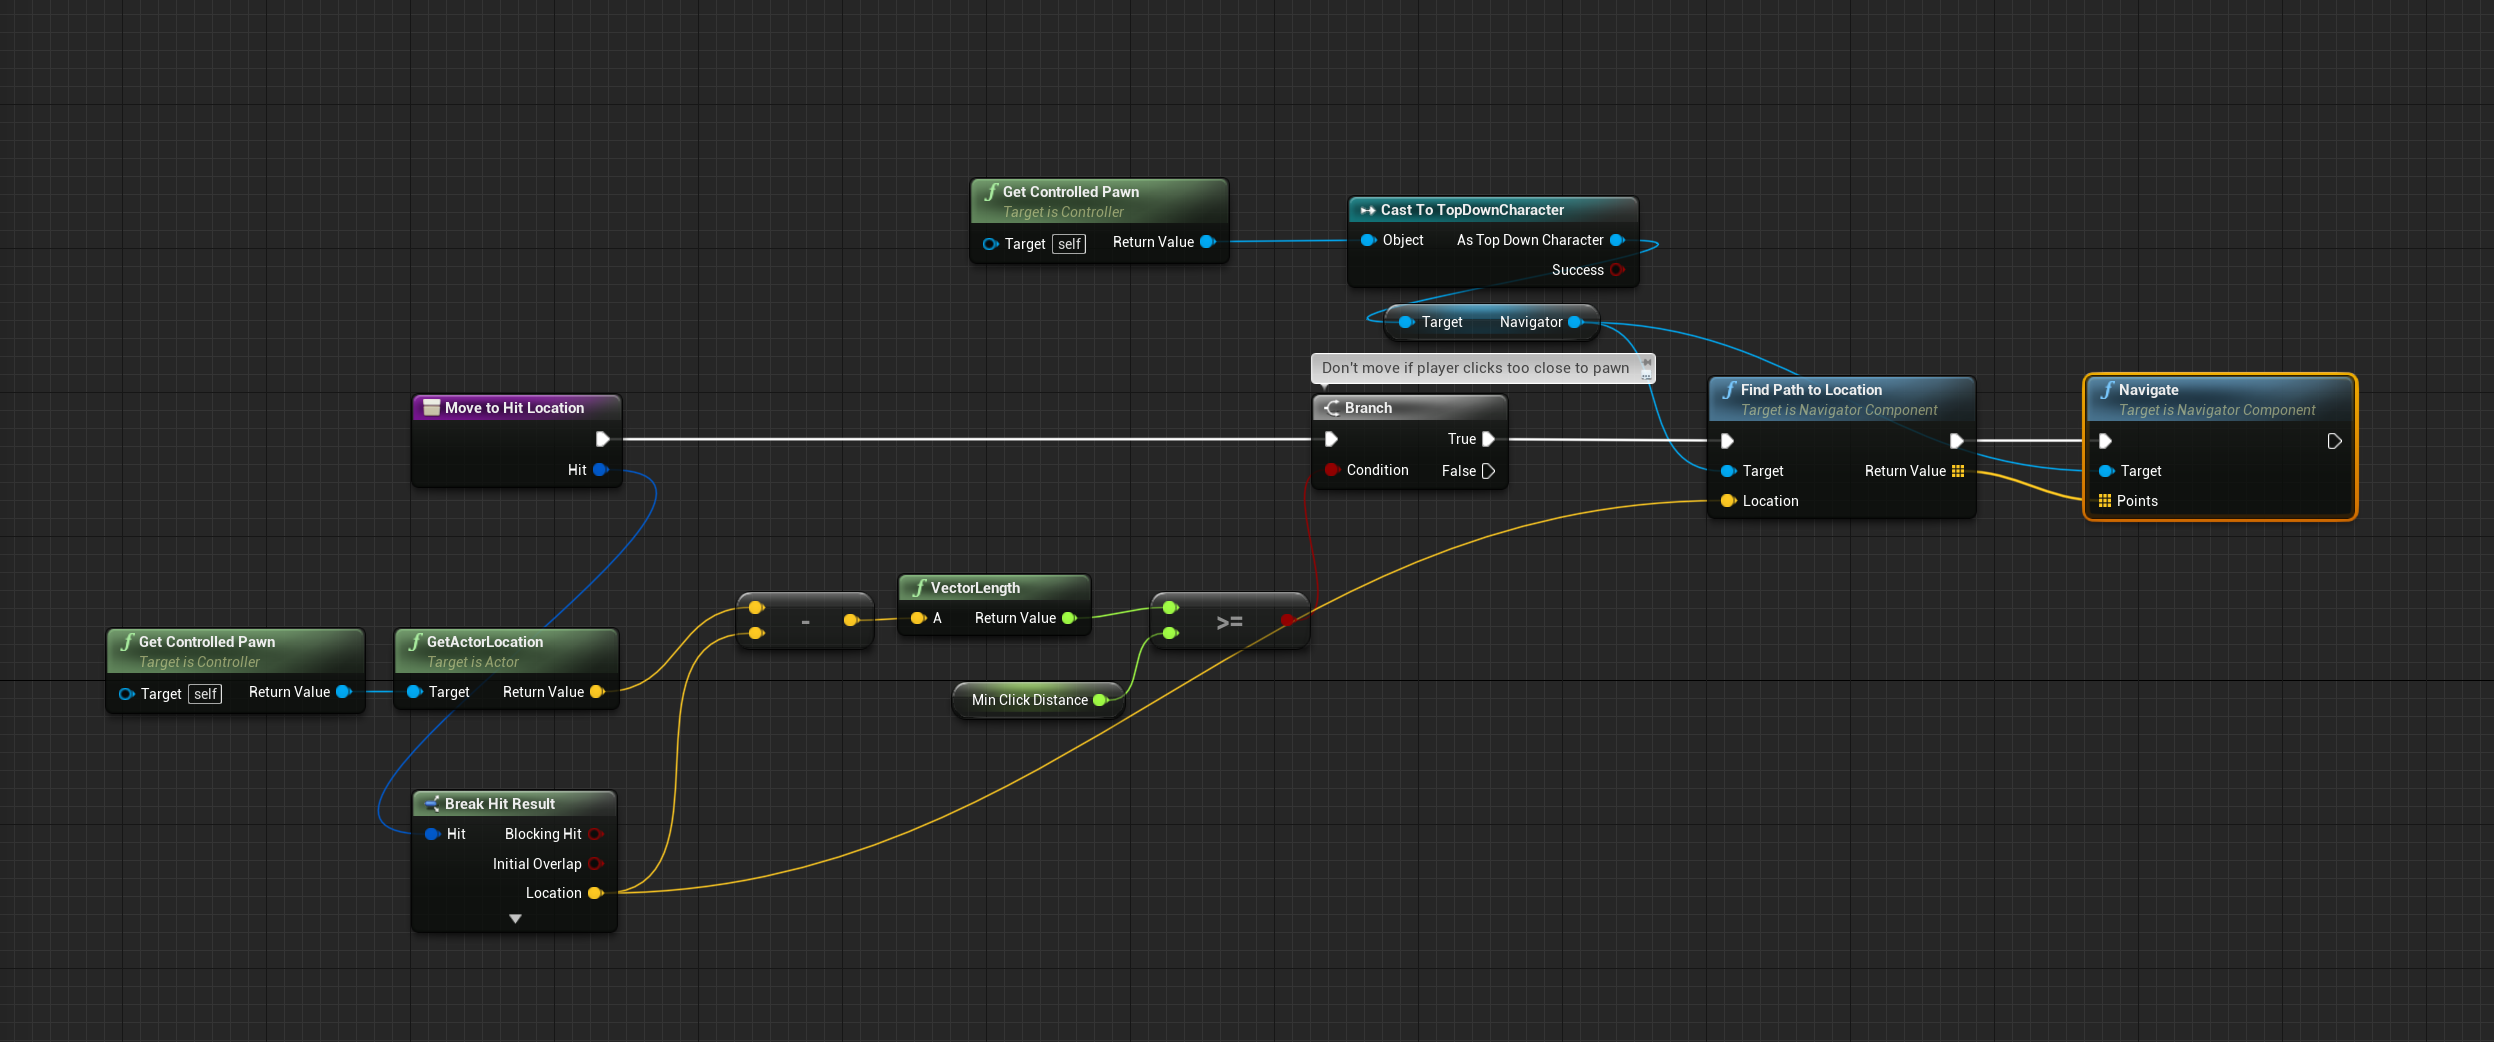
Now when you run the project, it will use the navigation component rather than the Simple Move To Location method of the AI library from Unreal.
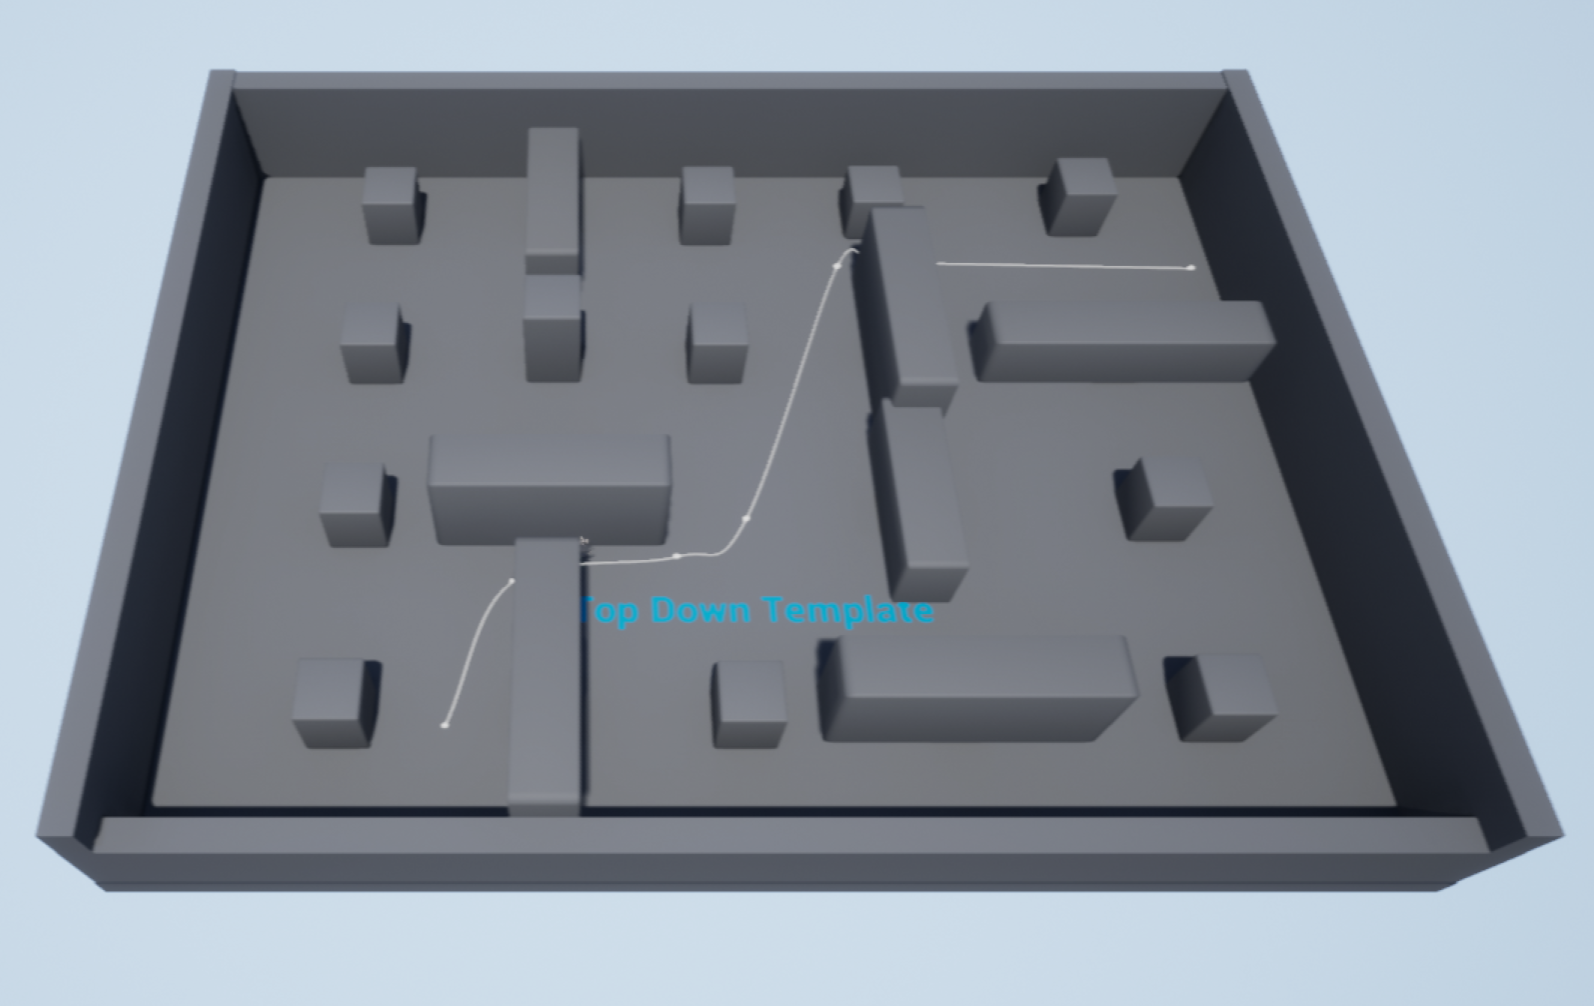
The spline can render itself on-screen, showing you the path the character will take. When running the game you can bring up the console by pressing the backtick (`) and type in
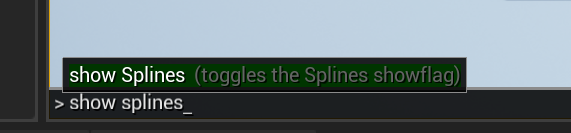
to show the spline being followed.
Networked game
By default, navigation is only done on the server. You can enable client-side navigation in the project settings, but I’m going to stick with doing the path finding on the server and use RPC to call from the client to server to find the path, then do the work of following the path on the client.
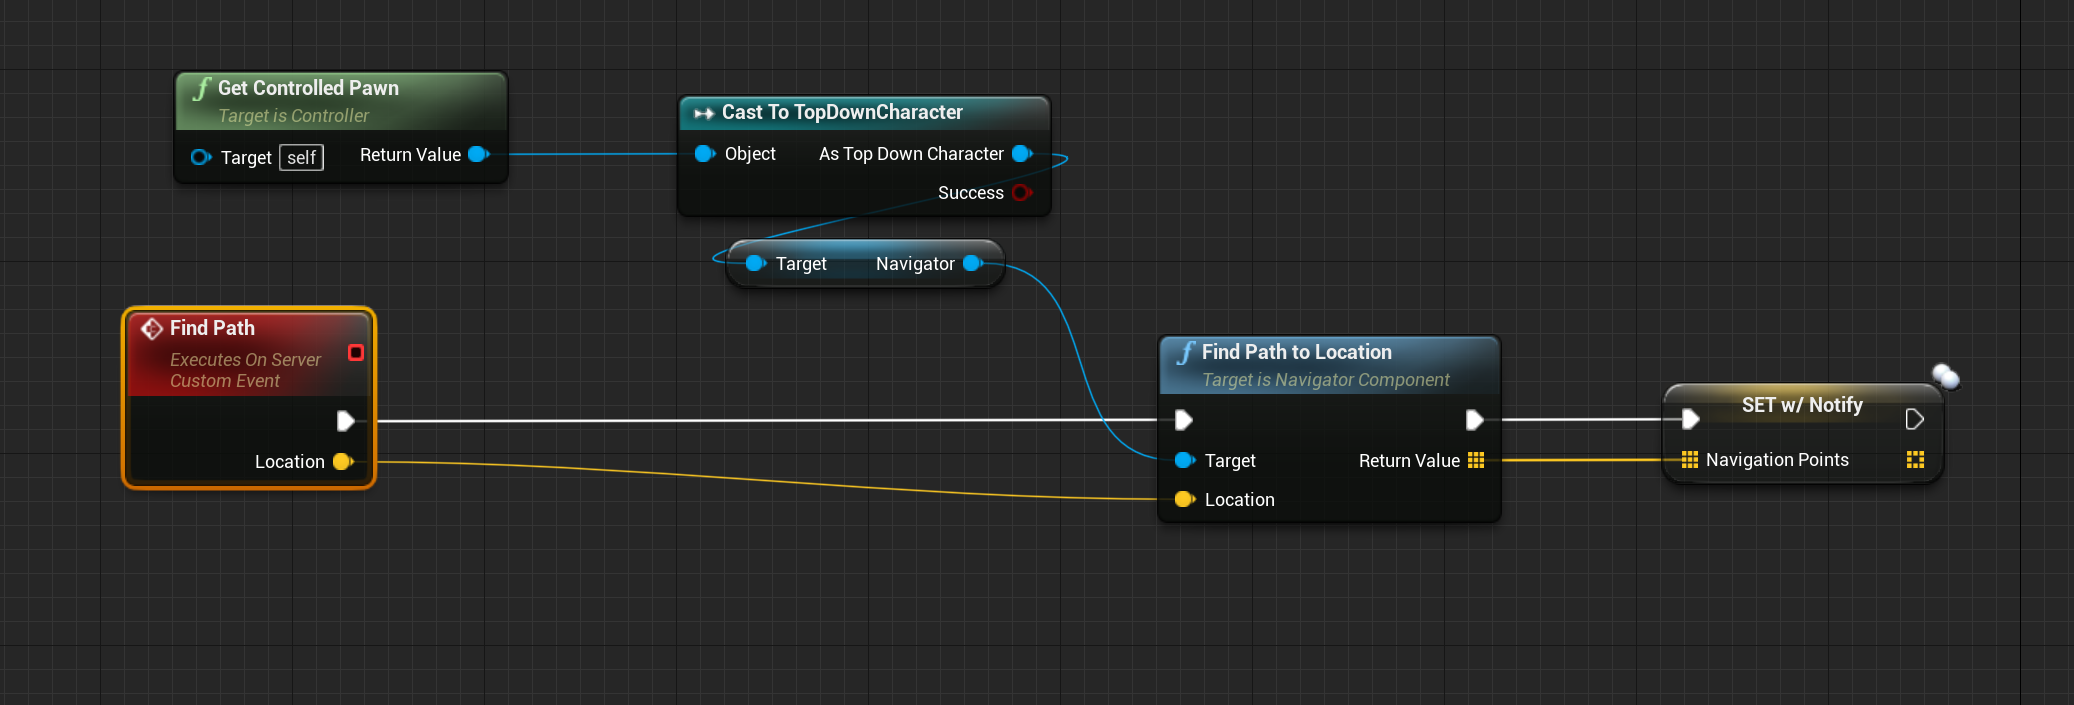
I added a new event the TopDownController blueprint, FindPath, that is set to execute on the server. As it can’t return a value, I added a variable, Navigation Points, as an array of Vectors, that is replicated with notify. This event calls the Find Path to Location method on the navigation component and sets the results to Navigation Points.
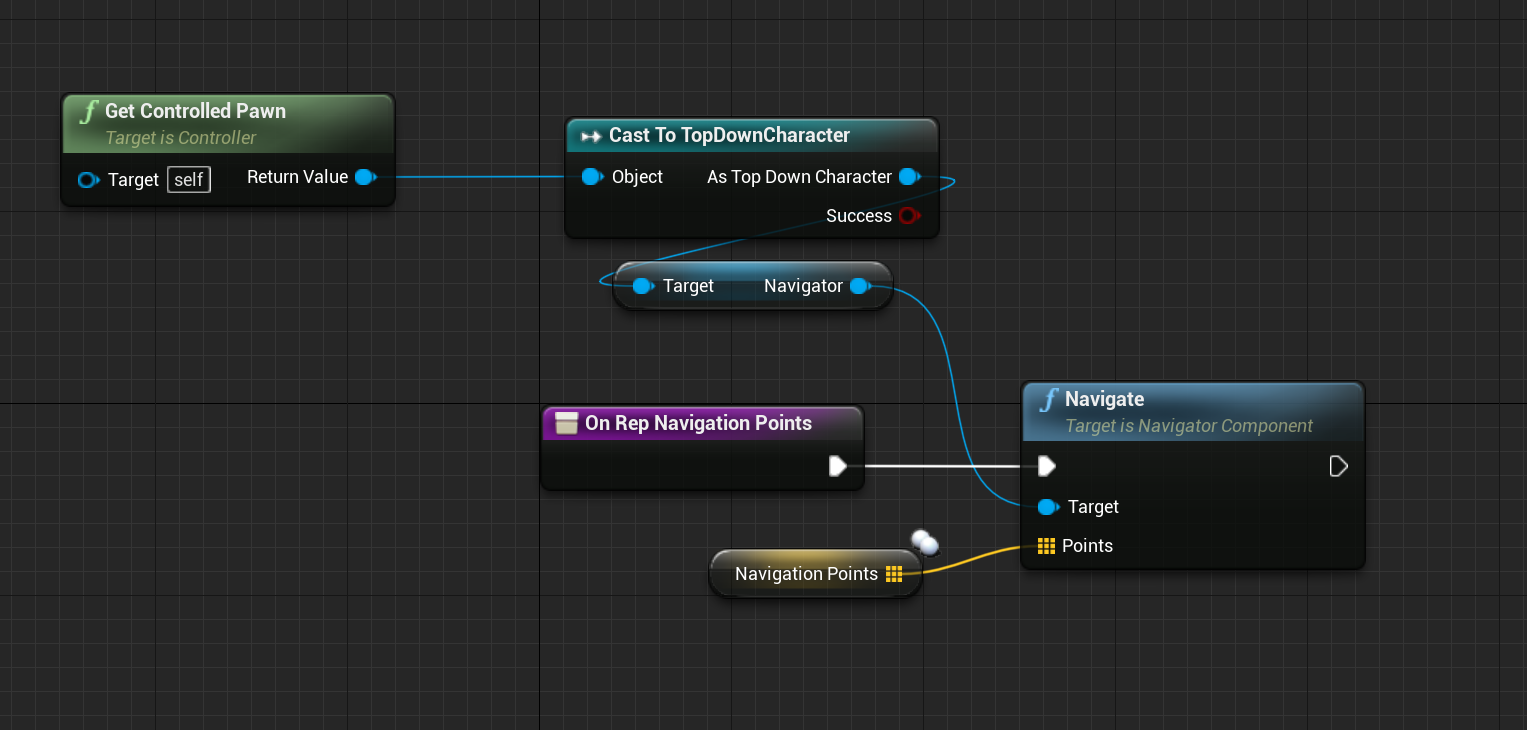
When those points are replicated over to the client, the points are passed to the Navigate of the component and it starts following those points towards the target.
Finding the path
The navigation system does all the work of finding the path. We return the results simply as an array of points in world space.
TArray<FVector> UNavigatorComponent::FindPathToLocation(FVector Location)
{
  TArray<FVector> Result;
  FNavPathSharedPtr Path;
  UNavigationSystemV1* NavSys = FNavigationSystem::GetCurrent<UNavigationSystemV1>(GetWorld());

  ACharacter* Character = Cast<ACharacter>(GetOwner());
  if (NavSys && Character)
  {
    const ANavigationData* NavData = NavSys->GetNavDataForProps(Character->GetNavAgentPropertiesRef(), Character->GetNavAgentLocation());
    if (NavData)
    {
      const FSharedConstNavQueryFilter NavFilter = UNavigationQueryFilter::GetQueryFilter(*NavData, this, nullptr);
      FPathFindingQuery Query = FPathFindingQuery(*Character, *NavData, Character->GetNavAgentLocation(), Location, NavFilter);
      Query.SetAllowPartialPaths(true);

      FPathFindingResult PathResult = NavSys->FindPathSync(Query);
      if (PathResult.Result != ENavigationQueryResult::Error)
      {
        if (PathResult.IsSuccessful() && PathResult.Path.IsValid())
        {
          PathResult.Path->EnableRecalculationOnInvalidation(true);
          Path = PathResult.Path;
        }
      }
    }

    if (Path)
    {
      const TArray<FNavPathPoint>& Points = Path->GetPathPoints();
      for (int PointIndex = 0; PointIndex < Points.Num(); ++PointIndex)
      {
        Result.Add(Points[PointIndex].Location);
      }
    }
  }
  return Result;
}
Navigation
Navigation is done with the aid of a spline component. The navigation points are fed to a spline - this allows me to easily interpolate between the points, as well as smoothing it out a bit, giving the character a more natural movement.
void UNavigatorComponent::Navigate(const TArray<FVector>& Points)
{
  Spline->ClearSplinePoints();
  for (FVector Point : Points)
  {
    Spline->AddSplineWorldPoint(Point);
    Goal = Point;
  }
  Spline->Duration = 1.0f;
  CurrentTime = 0.0f;
  NextPoint = Spline->GetLocationAtTime(CurrentTime, ESplineCoordinateSpace::World);
  Length = Spline->GetSplineLength();
}
Following the path is done on Tick, by adding appropriate movement input. First, we check to see if we’ve reached the goal - if so, we clear the spline and stop moving.
Then we check to see if we’ve reached the next point along the spline. Rather than using the navigation points directly we use the spline to interpolate between them, using the GetLocationAtTime method. When setting up the spline, we set its duration to its length, and as we move along the spline we advance the time by the distance between the points.
void UNavigatorComponent::TickComponent(float DeltaTime, ELevelTick TickType, FActorComponentTickFunction* ThisTickFunction)
{
  Super::TickComponent(DeltaTime, TickType, ThisTickFunction);

  if (Spline->GetNumberOfSplinePoints() == 0)
  {
    return;
  }

  const FVector ActorLocation = GetOwner()->GetActorLocation();
  DistanceToGoal = (Goal - ActorLocation).Size2D();
  if (DistanceToGoal <= GoalDistanceThreshold)
  {
    Spline->ClearSplinePoints();
    return;
  }

  const float DistanceToNextPoint = (NextPoint - ActorLocation).Size2D();
  if (DistanceToNextPoint <= DistanceThreshold)
  {
    CurrentTime += 1.0f / Length * DistanceBetweenPoints;
    NextPoint = Spline->GetLocationAtTime(CurrentTime, ESplineCoordinateSpace::World);
  }

  const FVector Direction = (NextPoint - ActorLocation).GetSafeNormal2D();
  const FVector ActorDirection = GetOwner()->GetActorRotation().Vector().GetSafeNormal2D();
  const float Scale = FMath::Clamp(FVector::DotProduct(ActorDirection, Direction), 0.5f, 1.0f);
  Cast<APawn>(GetOwner())->AddMovementInput(Direction, Scale);
}
Note that this code runs on the client, so it is easy to interrupt the path following when the player presses a movement button. We could also add visualization of the spline, beyond the debug rendering. I’ll explore that in a future post.
Get the code
The code for this project lives on GitHub:
https://github.com/snorristurluson/BasicClickToMove
You can download an executable demo for Windows here: Demo
Feedback is always appreciated!